
Munemachi and Hamachi: A Beginner’s Guide
When you first look at a katana, your eyes naturally go to the obvious features: the curve of the blade, the point, the cutting edge and, depending on the polish, the visible activity in the steel.
The two tiny notches near the base of the blade? They are much easier to miss.
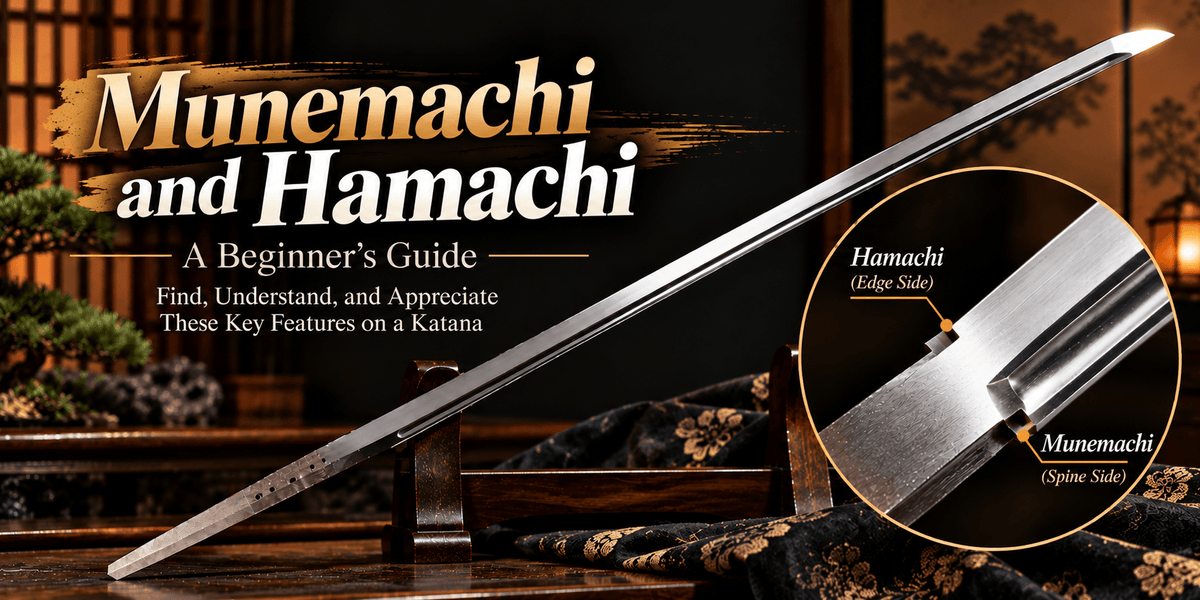
These notches are known as the machi. The one on the cutting-edge side is the Hamachi, while the one on the spine side is the Munemachi.
They may not look like much at first, but they are worth knowing about. They help define the transition between the blade proper and the tang, relate closely to the fitting of the habaki, and provide useful reference points when examining a blade's geometry and condition.
If you are new to Japanese swords, don't worry about memorising a long list of technical terms. Start with something simpler: learn where the Munemachi and Hamachi are, how to tell them apart and why people pay attention to them.
Once those basics click, the rest becomes much easier to understand.
What Are the Machi on a Katana?
Let's start with the basic structure of the sword.
A katana blade does not simply stop where the handle begins. The steel continues into the handle as the nakago, or tang. In a mounted sword, the nakago sits inside the handle.
Near the point where the visible blade transitions into the nakago are two small, step-like notches. These are the machi:
-
Hamachi — the notch on the cutting-edge side.
-
Munemachi — the notch on the spine side.
The terminology becomes much easier once you know two basic words.
Ha refers to the cutting-edge side of the blade, while mune refers to the spine.
So:
Ha → Hamachi → edge side
Mune → Munemachi → spine side
That's really all you need to remember at first.
Rather than treating Hamachi and Munemachi as two obscure terms to memorise, think of them as a pair. Together, they mark an important transition between the blade proper and the nakago.
That relationship is the key to understanding why these tiny features matter.
How to Find the Munemachi and Hamachi
If you have never examined an unmounted Japanese sword before, don't jump straight into trying to interpret what the machi might tell you.
First, learn to find them.
Imagine looking at a bare blade with the nakago visible.
Follow the cutting edge back towards the tang. Near the base of the blade, you will see a small step where the geometry changes.
That's the Hamachi.
Now look at the opposite side. Follow the spine towards the tang and look for the corresponding step.
That's the Munemachi.
A simple mental map is:
Cutting edge → Hamachi
Spine → Munemachi
Past the machi → Nakago
Easy enough.
The Munemachi can be less visually obvious than the Hamachi, particularly if you are looking at a photograph rather than examining a blade directly. That doesn't make it less relevant. It simply means you need to know where to look.
Once you do, the base of the blade starts to make much more sense as a complete structure rather than a collection of unrelated details.
Where Does the Habaki Fit In?
The next piece of the puzzle is the habaki.
The habaki is the metal collar fitted around the base of the blade. On a mounted sword, it sits just above the guard and is closely fitted to the blade in this area.
This is where understanding the machi becomes useful.
The habaki is not simply a decorative collar placed somewhere near the handle. Its fit relates directly to the geometry at the base of the blade, including the area around the Hamachi and Munemachi.
For a beginner, the easiest way to picture the relationship is:
Blade proper → Hamachi and Munemachi → Nakago
The habaki fits around the base of the blade in relation to this transition.
You don't need to understand the finer points of habaki construction to appreciate the basic idea. What matters is recognising that these features are connected.
The machi are not random decorative cuts. They are part of the structural geometry at one of the most important transition points on the blade.
Why Are the Machi Useful Reference Points?
Once you know where the Hamachi and Munemachi are, the obvious question is:
Why bother looking at them?
One reason is that they provide clear reference points at the base of the blade.
When discussing blade dimensions, proportions, geometry and possible changes over time, identifiable reference points matter. The machi help establish where the blade proper begins in relation to the nakago.
This is also useful when learning how the length of a Japanese sword is described.
The length of the blade proper, commonly referred to as nagasa, is measured from the machi area towards the tip rather than from the very end of the nakago.
That distinction is particularly useful for beginners comparing sword specifications online.
The nakago is physically part of the same piece of steel, but it is not treated as part of the blade length in the same way.
So the machi are not merely small details to spot in photographs. They also help you understand how the major sections of the sword are defined and described.
Munemachi and Hamachi Make More Sense Together
It is tempting to study the Hamachi and Munemachi as two separate features.
In practice, looking at them together is much more useful.
The Hamachi gives you a reference point on the cutting-edge side. The Munemachi gives you another on the spine side. Taken together, they help you understand the geometry at the base of the blade.
This becomes particularly interesting when examining an older sword.
A blade that has survived for a long time may not retain exactly the same dimensions it had when it was first completed. Polishing removes small amounts of steel. Corrosion can affect surfaces. Later alterations may also change aspects of the blade.
As a result, the geometry you see today may reflect both the blade's original manufacture and changes that occurred later.
The machi can contribute useful information when examining those changes.
But here's the catch: they should never be interpreted in isolation.
A pronounced Hamachi does not automatically mean a blade is in excellent condition. A shallow Munemachi does not, by itself, prove that a sword has been heavily polished. Nor can the shape of either notch establish the age or authenticity of a blade on its own.
They are clues, not conclusions.
That is an important distinction for any beginner to understand.
What Does a “Healthy” Blade Mean?
You may occasionally hear collectors describe a blade as being “healthy”.
In this context, the word does not simply mean that the sword looks clean, polished or free from obvious damage. It generally relates to how much of the blade's material and intended geometry remain.
A blade is a three-dimensional object.
It has width, thickness, curvature, ridgelines, surfaces, an edge, a spine and a point. All of these elements work together to create its overall form.
That means condition cannot be judged from a single measurement or one small feature.
For example, looking at the Hamachi and assuming that “deeper is always better” would be far too simplistic. Its shape needs to be considered alongside the geometry of the rest of the blade.
The same applies to the Munemachi.
It can provide a useful reference point when examining the base of a blade, particularly when compared with surrounding areas and the opposite side. But it remains only one part of a much broader assessment.
For beginners, a good rule of thumb is:
Observe first. Compare second. Interpret carefully.
That approach is far more reliable than trying to memorise shortcuts.
How Polishing Can Affect Blade Geometry
To understand why these reference points can matter, it helps to know a little about polishing.
Traditional sword polishing is not simply about making steel shiny.
A proper polish works with the surfaces and geometry of the blade while also making important visual characteristics easier to examine. Because polishing involves removing a small amount of material, repeated polishing over a long period can gradually affect a blade's dimensions.
The word gradually matters here.
This does not mean that every polished sword has lost its intended form, nor does it mean that polishing is inherently damaging. The point is simply that material removal is cumulative.
A blade preserved over a long period may have undergone more than one polish. How much material has been removed depends on many factors, including its condition and the work carried out on it.
Over time, changes may become visible in the blade's width, thickness, surfaces or other aspects of its geometry.
This is one reason why condition cannot be judged by shine alone.
A highly polished surface may look impressive, but brightness by itself does not tell you how much original material remains.
For beginners, this leads to a much more useful question.
Instead of asking:
“Does this blade look well polished?”
try asking:
“How well does the blade appear to retain its overall geometry?”
The Hamachi and Munemachi can contribute to that assessment, but they cannot answer the question on their own.
Why the Munemachi Is Worth a Closer Look
The Hamachi often gets more attention from beginners because it sits beside the cutting edge and can be easier to recognise.
The Munemachi tends to fly under the radar.
It sits on the opposite side of the blade, where many new collectors simply are not used to looking.
That is exactly why learning to identify it can improve the way you examine a sword.
Once you begin comparing both sides of the blade base, you stop thinking of a katana as a flat outline. You begin to see it as a three-dimensional object.
The edge and spine relate to one another. So do the width and thickness of the blade. The surfaces between them form a deliberate geometry rather than a simple flat piece of steel.
The Munemachi gives you another reference point within that structure.
It does not contain some hidden answer to a sword's entire history. Instead, it provides another piece of physical information that can be considered alongside the Hamachi, nakago and surrounding blade geometry.
That's a much more sensible way to approach sword appreciation.
What Is Machi-Okuri?
Once you are comfortable identifying the normal position of the machi, you may come across another useful term: machi-okuri.
In simple terms, machi-okuri refers to the machi position being moved farther up the blade, towards the tip. This changes the point at which the blade proper transitions into the nakago.
Why is that worth knowing?
Because the position you see on an older sword may not always be the original position established when the blade was first made.
This introduces an important idea for anyone studying older swords: the form you see today may include later alterations.
For beginners, there is no need to get bogged down in the technical process behind those alterations. The important part is understanding the result.
If the position of the machi has changed, measurements and proportions need to be considered with that alteration in mind.
Once again, context matters.
A single feature rarely tells the whole story.
What the Machi Cannot Tell You
Learning a new technical feature often creates a tempting shortcut.
You discover that the Hamachi and Munemachi matter, and suddenly it is easy to start judging every sword by those two notches.
Don't fall into that trap.
The machi alone cannot reliably tell you:
-
exactly how old a sword is;
-
whether a blade is authentic;
-
how many times it has been polished;
-
exactly why its geometry has changed; or
-
the complete history of the blade.
Those conclusions require more evidence.
This is especially important when looking at swords online.
Photographs can be deceptive. Lighting, viewing angle, image quality, fittings and polish can all affect how a feature appears. Something that looks shallow or unusually shaped in one photograph may appear quite different from another angle.
Good sword appreciation therefore depends on combining observations rather than searching for one visual trick that supposedly reveals everything.
The machi are useful because they add information, not because they replace the rest of the blade.
Common Beginner Mistakes
One common mistake is confusing the Munemachi with another ridge or change in the blade's surface.
Remember its location: the Munemachi is at the base of the spine, where the blade proper transitions towards the nakago. It is not a long ridge running along the side of the blade.
Another mistake is treating the machi as decorative details.
They are structural features associated with the transition between the blade proper and the tang, and they relate closely to the fit of the habaki.
A third mistake is focusing only on the Hamachi.
The cutting edge naturally attracts attention, but the spine side can provide useful information as well. Training yourself to look at both sides gives you a more complete picture of the blade's geometry.
The biggest mistake, however, is drawing large conclusions from tiny details.
A particular shape or depth of machi should not be treated as automatic proof of age, authenticity, condition or a specific event in a sword's past.
And finally, don't get too hung up on the terminology.
If you forget the Japanese names, return to the basic structure:
Ha = edge
Mune = spine
Hamachi = edge-side notch
Munemachi = spine-side notch
Nakago = tang
Once the physical layout makes sense, the terminology tends to stick.
A Better Way to Look at a Katana
Whether you are studying a blade in Australia, comparing photographs online or simply trying to understand Japanese sword anatomy for the first time, don't worry about how many technical terms you can memorise.
Instead, focus on how the parts relate to one another.
The Munemachi and Hamachi are a perfect example.
At first, they look like two tiny notches.
Then you learn that they sit at an important transition between the blade proper and the nakago.
Next, you notice their relationship with the habaki.
After that, they become useful reference points for understanding blade dimensions and geometry.
Finally, when looking at older swords, you begin to understand why polishing, corrosion and later alterations need to be considered carefully rather than reduced to simple rules.
That progression — from recognising a feature to understanding how it fits into the whole — is one of the most useful habits a beginner can develop.
Final Thoughts
The Munemachi and Hamachi are easy to overlook, but they offer an excellent introduction to the structure of a katana.
The Hamachi is the notch on the cutting-edge side. The Munemachi is its counterpart on the spine side. Together, they help define the transition between the blade proper and the nakago, while also relating closely to the fit of the habaki.
More importantly, they teach a broader lesson about sword appreciation.
A Japanese sword should not be understood through isolated features.
The depth of one notch, the brightness of a polish or the appearance of a single surface cannot tell you the complete story of a blade. Condition and geometry need to be considered across the sword as a whole, particularly when looking at older examples that may have been polished or altered over time.
Learning about the Munemachi and Hamachi, then, is not really about memorising two specialised terms.
It is about learning to read a sword structurally.
Once you can see how the edge, spine, tang, machi and fittings relate to one another, those tiny details stop looking insignificant. Instead, they become useful reference points for understanding the blade as a complete, three-dimensional object.
For anyone beginning to explore katana and Japanese sword anatomy, that's a far stronger foundation than trying to judge an entire blade from one feature alone.