Beginner’s Guide: Don’t Forget These Two Small Copper Spacers When Assembling a Katana
When assembling a katana for the first time, most beginners focus on the obvious components—the blade, the guard, the handle wrap. In comparison, two thin copper pieces often get overlooked. They appear minor, almost insignificant, and easy to forget.
That assumption is a mistake.
Those two small copper spacers play a critical role in the sword’s structural stability, safety, and long-term durability.
Skipping them can lead to looseness, uneven stress, and premature wear—problems that no amount of tightening can fix later.
This guide explains what these spacers do, how to install them correctly, and why experienced builders never assemble a katana without them.
What Are These Copper Spacers?
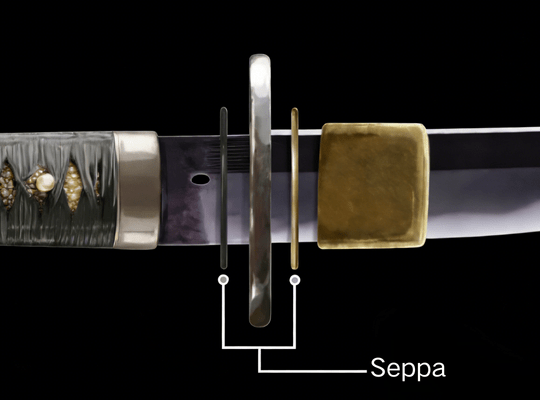
These thin copper parts are commonly referred to as seppa, but for practical purposes, it is best to think of them simply as precision spacers.
They are not decorative. Their purpose is entirely structural:
-
They eliminate tiny gaps between components
-
They lock the guard firmly in place
-
They absorb vibration during movement
-
They prevent direct metal-to-metal wear
In mechanical terms, they serve the same role as washers in precision assemblies.
Why These Small Parts Matter So Much
A katana is not held together with screws, glue, or permanent fasteners. Its design relies on compression and exact fit.
Each component presses against the next. When assembled correctly, the entire structure behaves as a single, solid unit.
Without proper spacers:
-
The guard may shift or rattle
-
The handle may not seat fully
-
Stress concentrates in the wrong areas
-
Wear accelerates over time
Even a tiny amount of looseness—less than a millimeter—can be felt immediately in the hand. Left uncorrected, that looseness only gets worse.
These copper spacers are what prevent that chain reaction.
Correct Placement: Where the Spacers Belong
A standard katana uses two spacers, one on each side of the guard.
The correct order from blade to handle is:
-
Blade
-
Blade collar
-
First spacer (blade side)
-
Guard
-
Second spacer (handle side)
-
Handle collar
-
Handle
This layered structure ensures that the guard is evenly compressed from both directions. If only one spacer is used—or one is missing—the guard cannot be properly secured.
Step-by-Step Assembly Guide
Step 1: Verify the Blade Collar Position
Before installing anything else, confirm that the blade collar is fully seated against the blade shoulder.
This surface sets the alignment for every component that follows. If it is even slightly misaligned, the entire assembly will be affected.
Step 2: Install the First Spacer (Blade Side)
Slide the first spacer onto the tang until it rests against the blade collar.
Many spacers have a subtle taper. If it does not sit flush, rotate it and try again. It should slide into place smoothly.
Never force it.
Step 3: Install the Guard
Slide the guard onto the tang so it rests firmly against the first spacer.
At this stage, the guard should sit flat, without rocking or visible gaps.
Step 4: Install the Second Spacer (Handle Side)
Place the second spacer directly behind the guard.
This step is just as important as the first spacer. Together, they create balanced compression on both sides of the guard.
Skipping this spacer is one of the most common beginner errors.
Step 5: Install the Handle and Secure the Assembly
Slide the handle onto the tang until it presses firmly against the second spacer. Once aligned, insert the retaining peg.
A correctly assembled katana should have:
-
No guard movement
-
A fully seated handle
-
No rattling, clicking, or shifting
If any movement is present, disassemble and recheck spacer placement.
Common Beginner Mistakes
1. Using Only One Spacer
This may seem acceptable at first, but it almost always results in gradual loosening.
Both spacers are required.
2. Installing a Spacer Backwards
Because spacer openings are slightly tapered, incorrect orientation can prevent full seating.
If parts refuse to sit flush, orientation is usually the issue.
3. Using Improvised Substitutes
Paper, plastic, tape, or soft metals are not viable replacements.
Copper is used because it provides controlled compression while maintaining strength. Substitutes fail quickly and create uneven stress.
4. Ignoring Minor Looseness
“Almost tight” is not tight.
Precision assemblies do not improve with use—they degrade. Fix small issues immediately.
Why Copper Is the Preferred Material
Copper is chosen for practical engineering reasons:
-
It compresses slightly under pressure
-
It absorbs vibration effectively
-
It resists corrosion
-
It protects harder steel components
In structural terms, copper spacers act as controlled deformation buffers, improving both fit and longevity.
Function Over Decoration
These spacers are not symbolic elements. They are functional solutions refined through long-term practical use.
Even modern training swords and replicas rely on the same compression-based logic to achieve stability.
Why Experienced Builders Never Skip This Step
Seasoned builders can judge assembly quality the moment they pick up a sword.
That solid, unified feel—the absence of hollow movement or vibration—comes largely from correct spacer installation.
Skipping them saves no time, costs nothing to do properly, and causes problems that are difficult to correct later.
Final Thoughts: Small Parts, Serious Impact
A katana’s stability does not come from force. It comes from precision fit.
These two small copper spacers determine:
-
Structural integrity
-
Handling safety
-
Long-term durability
If there is one rule to remember, it is this:
Never assemble a katana without both spacers properly installed.